How to create a Newsletter

- From home page click on Newsletter module
- If it’s a new newsletter click on

- If you require an image for your newsletter you can drop a JPG image in the box on the right of your screen which will show when you click on the newsletter.
DETAILS TAB
- Newsletter Title this is where you name your newsletter, you don’t need to put the date in the title as the date comes in the ‘Dated’ box below. So, for example you could call this Spring Term Newsletter.
- Summary can be left blank
- Page Template (web only) can be left as it is
- Dated is where you put your date of your letter
- All Day ignore
- Calendar Category ignore
CONTENT TAB
This is where you build your newsletter – what do the headings mean?
Heading - This is the main title for your letter – large and in bold
Sub-Heading - This is where you can put a sub-heading for different subjects within your letter.
Paragraph - This is for your large amounts of text.
Quote - This will be wrote as text
Box-Out - The text will be as it says in a grey box to stand out if needed.
Hyperlink - You could put a link to any part of your website for example your calendar or you could put a link to ofsted.
Bullet points - To bullet point things
Image slider / carousel - To drop pictures in
Table - To create a table for example a list of staff
Video - To put a link to YouTube – copy the link in YouTube after the =sign.
To add content, click once on the tab you want to insert :
So, for example start with a Heading, click on the Heading link, a box will appear on the right hand side under the header box, type your Heading in here, then click outside the box (which saves what you do)
Then if you want to add some text just click on Paragraph again this will insert a box under your heading for you to start typing in. when you click outside the box the format will change as it puts it into paragraphs for you.
You can quickly start to build your newsletter.
If you want to drop images in you can by dragging a dropping onto the upload browse box or click on browse the image will appear under the last section you have created. Any part of the newsletter can be moved around by dragging and dropping… give it a go.
This is where other members of staff can open the newsletter you have started and add some content, as the final document can be rearranged and put in order at the final stage.
And finally, the newsletter will not be published until you tick the published button in the Access tab. Or of course you can select here who see’s the newsletter.
Now click on the Back button, your newsletter will be listed here.
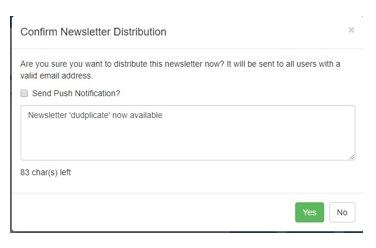
When you are happy with your newsletter; distribution is done simply by clicking on the distribution link, the following box will appear for you to confirm your happy. You can also send a push notification to all your parents, by simply putting a tick in the Send Push Notification? Box and clicking on Yes
You can also save your newsletter as a template so when you click on your newsletter icon from your home admin screen
Find the newsletter you want to duplicate and click on Duplicate

You an give this one a generic New Article Name and Apply.
It will automatically take you into the newsletter, but if you just click back you will now see the in the list your duplicated newsletter template.
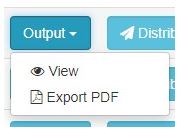
You can also print your newsletter as a PDF. If you click on Output, you can view your newsletter here and print it as a PDF